Showing posts with label diy. Show all posts

May 25, 2013

DIY Kate Spade Cameo Jewels Bib Necklace

 DIY Kate Spade Cameo Jewels Bib Necklace
DIY Kate Spade Cameo Jewels Bib Necklace

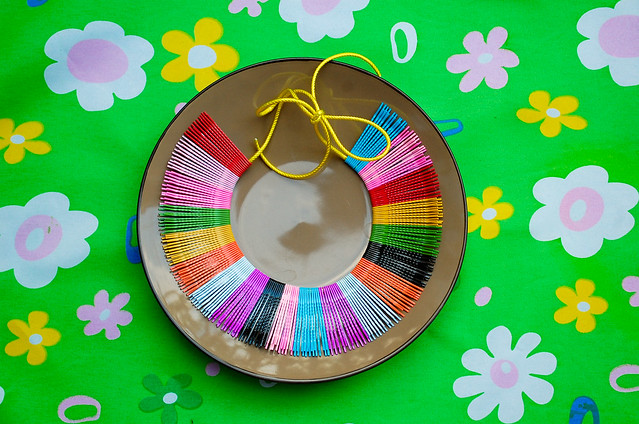
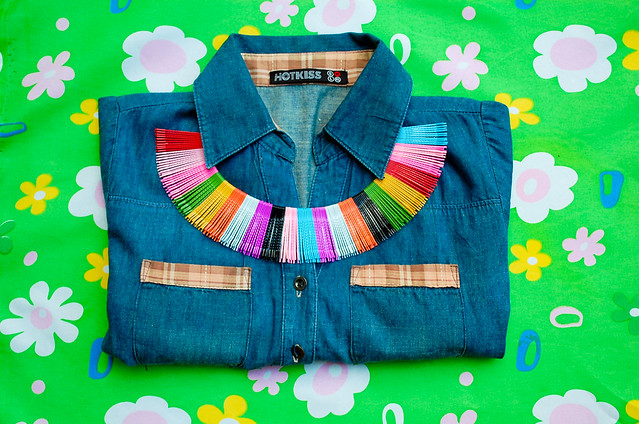
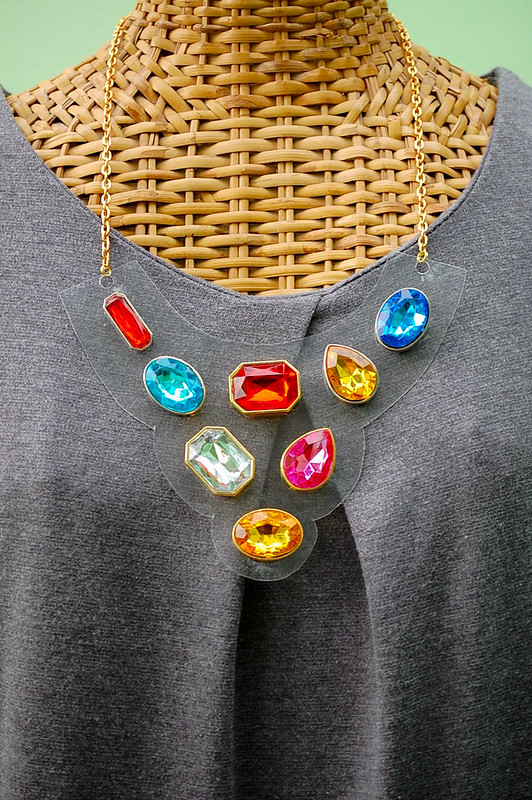
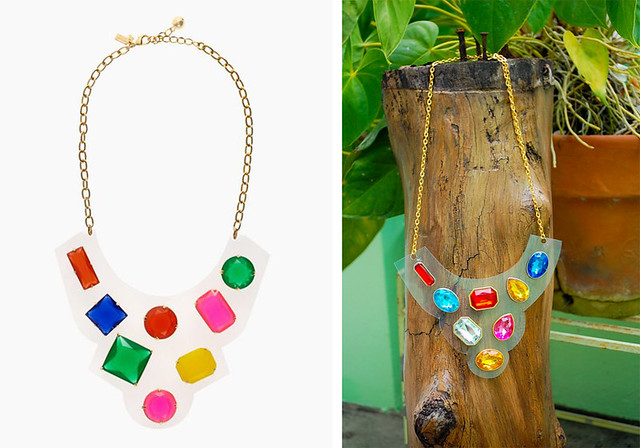
left: Kate Spade. Right: DIY

Ever since this Kate Spade necklace came out last year I've been dying to make my own cheap version of it.

DIY Kate Spade Cameo Jewels Bib Necklace

So here's the deal-io my girls, this Kate Spade necklace costs about 198$ and it's on sale now for 99$. Still I 
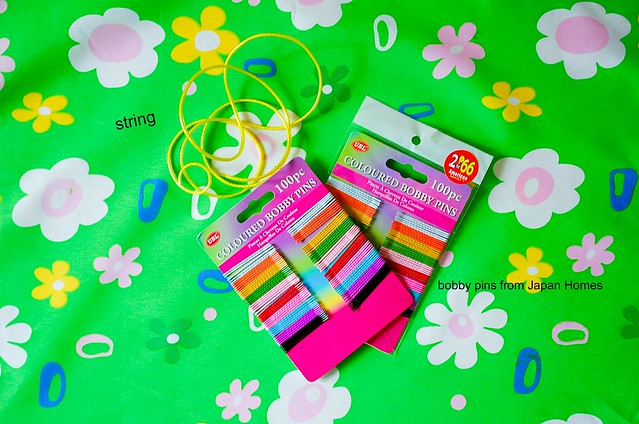
don't have 99$ to afford this. But I have my dear darling husband who bought me the jewels from Quiapo (that one time he went to Manila w/o me) 
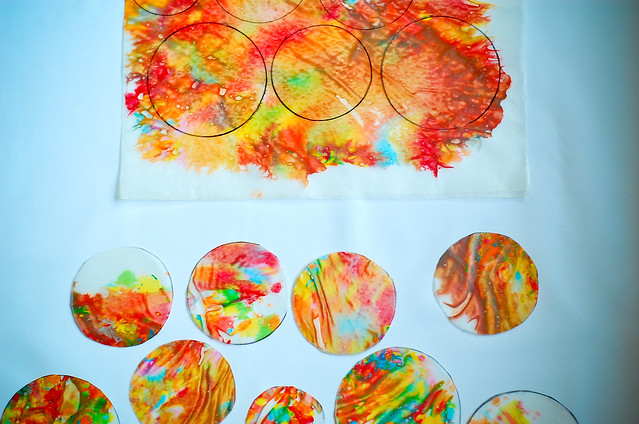
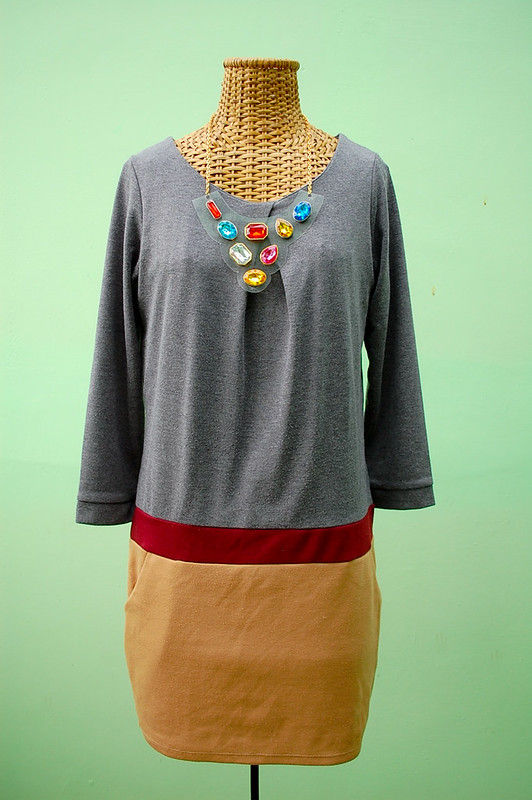
and the rest as they say is whaaalaaahhh!!!-here's-my-DIY-Kate-Spade-necklace-made-from-semi-scratch. 

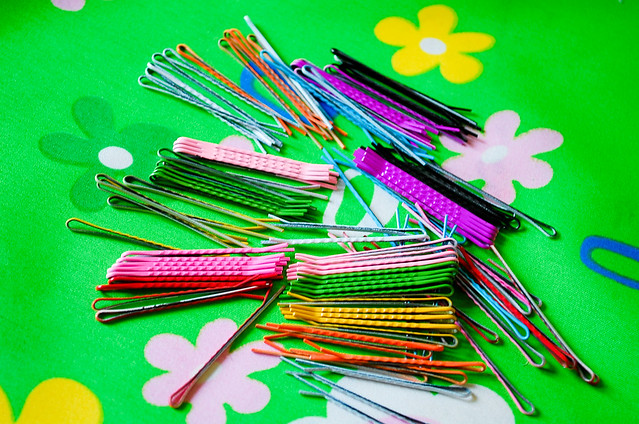
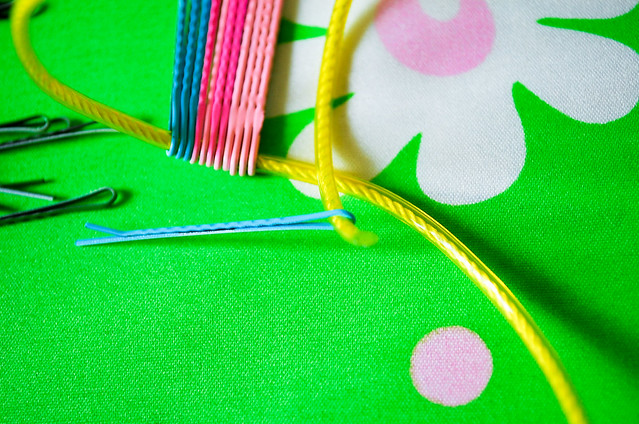
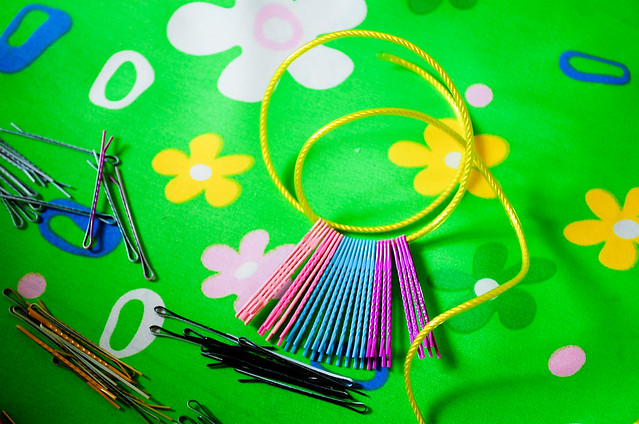
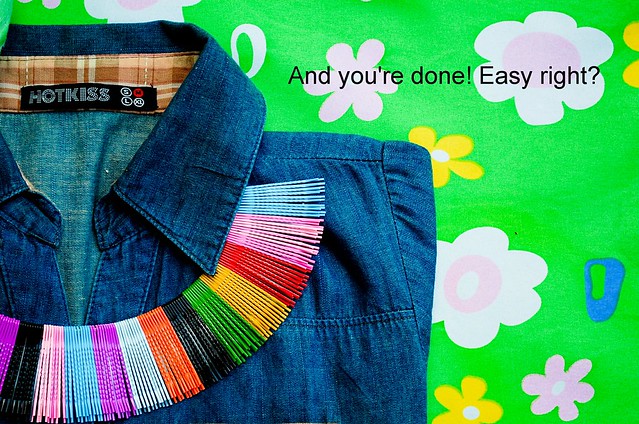
It's not magic but it's real easy... i pinky promise.

April 19, 2013

DIY: Heart Print Shirt

DIY heart print shirt

my DIY heart print shirt

heart sweater-1
IMG_8877ee
24066_SW4567

photo source 1, 2, 3

I have always loved these J.Crew heart sweater. But you know, I cannot afford one or will I ever attempt to buy one. But in my dreams, I bought one in every color. Since I am living in a real world of my pocket, I made one. It is not perfect, but I am planning to make another one next week. A much bigger heart in a bright yellow color. Also, hoping to avoid those accidental little drips. Anyway, here's how I did it...


March 9, 2013

DIY Silver Bottle Flower Vase

diy silver bottle flower vase


Hi ladies!

January 19, 2013

DIY Cool Party Idea - Hand Painted Paper Cups

diy handpainted paper cups

I made this today. Yay! 

Don't you hate it whenever you lose your cup in a party,

November 13, 2012

DIY Bobby Pins Necklace

DSC_8890

Hi everyone! Today I am sharing to you this colorful, simple and easy necklace I made using bobby pins. 
Here's how...

DSC_8875
DSC_8879
DSC_8885
DSC_8886
DSC_8894
DSC_8896

-the end.


November 8, 2012

DIY Sponge Paint Dress

DIY Sponge Paint Dress, Denise Katipunera, diy, do-it-yourself


Today, I made a colorful dress. Yes. Another colorful dress. It's really easy. It just took me less than an hour to paint the front of the dress. It's the drying that took a lot of time before I can start painting the back of the dress. But it's okay, because I had a great time doing this project. Anyhow...here's how... (am a genius, It rhymes)

First, you need a boring dress. White or any pastel preferably.

DIY Sponge Paint Dress, Denise Katipunera, diy, do-it-yourself
DSC_8850
DIY Sponge Paint Dress, Denise Katipunera, diy, do-it-yourself

aaaand that's about it. Also, use any kind of gloves so the paint won't transfer to your hands. I used surgical gloves because it's thin enough for me to feel everything. After sponge painting the whole dress, let it air dry for a couple of hours. Iron the dress under a piece of paper before washing and bam!!! you have got a new colorful dress. Very colorful dress. Now, I cannot wait to parade this one out. And hopefully soon. Well, I hope you enjoyed this easy fun diy project and try it on your own sometime.

God bless and goodnight to all.

October 31, 2012

Happy Halloween!!!

Untitled-1
DSC_8608
Untitled-2

whatchagonnabe this Halloween? Us? Oh well, first, we'll just stay home and watch scary movies. Boring I know. But hey, look at our oranges dressed up as pumpkins. Not bad for a costume ei? So cute. A fruit, Halloween props and organic toy in one.

DSC_8607

Happy Halloween guys! Have fun.

October 12, 2012

DIY - Acrylic Gemstones Clutch

 DSC_8341

I always wanted a sparkling clutch so i made one. It really is super easy. The key to this diy is finding these acrylic gemstones. Found mine at our local craft store. And I think if you have the time, or you live in Manila, you can go to Quiapo. You can buy these by the bulk and in much cheaper price. Plus you'll have greater option on what material to use. So basically I used a super strong glue that sticks and dry in no time. But be very careful when you're using mighty bond because it dries fast and can chip off a chunk of your skin. Ouch! I wanted to cover the whole clutch but my fingertips are hurting right now as we speak.

DSC_8147
DSC_8338
DSC_8339

easy ei? Oh! I cannot wait to use this on a date night.

ps,

Next project. #inspiration

the clutch was for my arms and these are for my feet.....THE next project. Soon as i find the right shoes...

April 5, 2012

DIY Chalkboard Mug


DIY chalkboard mug

My dear sweet husband makes the best coffee. He make me the best one everyday, and i just love how he ask for a kiss first before giving me my mug. Haay, anyway, since I am not good at making coffee, why not make a cute coffee mug so husband can scribble silly messages on it. I like silly little notes. And I think you like it too right?

If you're interested to know how to make this, continue reading after the jump. (so jump!) silly!

March 29, 2012

DIY Metal Toe Cap


DIY Metal Toe Cap

I love that fuzz free shoes is finally making a comeback. But of course it's not a good comeback without a twist ei? And i just love pointy heels with those cute tipped toes. And this Zara heels is my favorite. Since I have no Zara budget, I made one from Shoe Etiquette's Lisa heels

March 23, 2012

The Purple Evelyn


Purple Evelyn
Purple Evelyn
Purple Evelyn
Purple Evelyn
Purple Evelyn

I never thought that purple and leopard could look good together. This shoes is my first ever purple in my closet. I guess I was scared of this color for such a long time that i never saw the fun with it. 

Anyway, let's talk about the weather shall we? Boy oh boy was it hell hot this week? And I am having a hard time leaving the house because of this heat. And also am having a very difficult time constructing a decent outfit. And to add to that, I seem to be going through a total metamorphosis every summer : my dear big old foot expands all of a sudden and my hair gets huge and frizzy. Every summer it has become a challenge for me dressing up. God knows I will never show my arms. No-oh! These arms will never be summer ready ever! So am planning to hit the thrift store this week (so you think am gonna say gym?) to look for breezy tops and more skirts but then  it's hot and thrift stores here aren't the most comfortable place on earth most especially with this summer heat. So I'm doomed. I remember a friend saying once, when all else fails (your clothes), don't wear anything at all. But that's just a criminal offense. So forget it.

But on a bright side, see the purple top am wearing? I tweaked it a bit by dabbing a piece of cloth with bleach in it. And just dab dab dab. It's still purple but not too purple anymore. And this skirt? It was once a midi, but decided to cut off some of it for a more summer look.

So, tell me, how do you stay covered on days like these? 
 
top:diy
skirt: trhift
"Evelyn" wedges: shoe etiquette   

February 29, 2012

DIY Floral Pouch


DIY Flower Patch Pouch

I made this pouch yesterday. No stitching involved. Don't you hate it when you have to stitch? I do!

DIY Flower Patch Pouch

  • you will need a pouch or clutch or any bag, (I got mine as free from last year's Christmas shopping) 
  • a piece of leather, or felt paper or any fabric. Actually it's up to you on what material to use for the flower pattern. 
  • And a very good paste. I used Mighty Bond.
DIY Flower Patch Pouch
DIY Flower Patch Pouch,

Cut out your flower pattern and paste right into the pouch. And that's it. Easy right?

DIY Flower Patch Pouch

Now my pouch is summer ready. Yey! 

February 27, 2012

DIY Gold Bangles


diy gold bangles and cuff,

I am no King Midas but I managed to turn some of my old bangle and that bronze cuff my husband gave me a long time ago into gold using a gold spray paint of course. c",)

diy gold bangles and cuff,

You will need a can of spray paint. And here, I used a tape to give some of the bangles a different pattern. Spray from a good distance and wait for a couple of minutes to dry for second or third coat.

diy gold bangles and cuff,

After drying, i then wrapped around a green and orange yarn to one of the bangle for a more summer look.

I hope you liked this easy and fun and cheap diy to give your old accessories a new fresh look.

Have fun everyone. Enjoy your day.

It's Gonna Be A Great Week


bag from baguio, denise katipunera, dyed red shorts, pinay filipina fashion blogger,

Our Saturday was not something I consider good. Our car broke down and we missed seeing all our friends as well as the first birthday party of our friend's baby in the city. And yesterday (Sunday) we have no power at home from 8am to 3 in the afternoon. Great right? But at least i got myself a red shorts which isn't red originally.(dyed it red) It was white and seen worn here at a time my scalp was puking real bad perm job and talking about Wars and Vampires. Now that's awesome for my memory lane.

and if you're interested to see the rest of my outfit and awkward poses and dark knees pls click after the jump. c",)

February 25, 2012

DIY Crayon Light Catcher


DIY Crayon Light Catcher

Give your window something pretty to look at and through with these translucent hanging circles made of  melted wax-crayons and waxed paper. Here's how...

DIY Crayon Light Catcher

You will need wax-crayons, waxed paper and iron.

DIY Crayon Light Catcher

using a pencil sharpener shave some crayons and deposit it inside the folded waxed paper.

DIY Crayon Light Catcher

Iron lightly on medium heat. Just give it a quick sweep because the crayons tend to melt easily. You can use brown paper to protect your ironing surface just in case there's an unexpected spilling. After all the crayons melted, let cool. And then trace your shapes (just circles for now, but you can use hearts, or other shapes) and cut. And that's it. Hang them by the window with any string of your choice.

DIY Crayon Light Catcher

Now I feel cheerful already. c",)

I wish you all a great weekend! God bless.

LinkWithin

Related Posts Plugin for WordPress, Blogger...